Tuesday, July 31, 2012

Roomies Reunited :0)

There are so many reasons why I think of Linfield College and smile
...these two girls are some of my favorite reasons! 

Though life has definitely changed, no matter how little or often I see them,
it's like it was just yesterday...
...having an all dorm water fight in Whitman 
 or laughing until dawn in the "Yellows".  :0)

We are FINALLY all in the same state again!
Hey, it only took like 13 years, but we're here! 
So we decided to meet in the middle which brought us to Newberg, Oregon. 
Originally, we were going to meet at a really cute neighborhood restaurant called, Recipe.
http://recipenewbergor.com/

Sadly, it was closed on Monday's.  I guess we're just going to have to meet again soon. 
(I'll take ANY excuse to meet up with these girls!)

Thank goodness we were in Newberg, middle of wine country, so we figured that we would find something else.  Unlike our college days, we had smart phones in hand and just did a quick little search.  Which led us to...

It would be easy to miss this little gem of a restaurant.
Don't drive too fast, because it was a tasty little treat.
Plus, Monday is half-off bottle of wine night! Bonus!

Between, chatty and chatty with two of my favorite people,
we selected meals from this delicious menu.
I didn't have to look at it too long, before I saw it...bacon. 
Not just any bacon, but candied bacon, and it's in Mac and Cheese. 
I think this was the easiest decision of the day.  Picked. Done.

The meal included soup, salad, and your course...all deliciously prepared. 
And just look at that Mac and Cheese! 
It is rich, rich, rich, so prepared to take at least half home. 

Of course, the best part was the company. 
Cheers to dear friends who thankful, never, ever change.
Cheers to Subterra for letting us hang out all evening
and enjoy our 3 hour break from reality. :0)

Now, it's your turn to go..go!
Subterra - A Wine Cellar Restaurant1505 Portland Rd. (99W at Villa Rd.)
Newberg, OR 97132
(503) 538-6060
Behind Mike's Pharmacy, Underneath the Dark Horse Wine Bar

Monday, July 30, 2012

Eggplant Parm-Parm Lasagna

Somehow...this is scary to me.  It's big and purple, like Barney.  "I love you. You love me. We're a happy family..."  That song runs through my head as I stare at the eggplant. 

It wants me to love it, but I've had some bad eggplant dishes in the past.  Now it's my turn to take a stab at it and my goal is to make it yummy and to use as many things as I can from my ProFarm Produce box.  This week in my box, I had 4 Roma tomatoes, garlic, Walla-Walla onions, and carrots that I will use in the recipe.  Yes...carrots.  I like to sneak as many veggies as I can into my meals. :0) Yep, just like you do with kids.  The only difference is that I know that they're in there!

Eggplant Parm-Parm Lasagna
This recipe is adapted from
Tyler Florence's Eggplant Parmesan Eggplant Parmesan on the Food Network
 and Danny Boome (Rescue Chef on Food Network) Eggplant Lasagna on the Food Network
Ingredients
  • 1 HUGE eggplant or 2 large eggplants
  • 1/2 cup flour
  • 2 tablespoons olive oil, for caramelizing onions
  • 1 box no-boil lasagna sheets
  • 2 or 3 carrots thinly sliced
  • 1 large onion diced
  • 2 tablespoons freshly chopped basil leaves
  • 2 (28-ounce) cans tomatoes (or 1 can and 1 jar- that's what I had on hand)
  • 4 or 5 Roma tomatoes
  • 4 cloves garlic, minced
  • 32 ounces of ricotta Cheese- (32 oz...Why? Because I love ricotta!)
  • 3 eggs
  • 2 cups grated Parmesan, plus more for sprinkling (It's double parm!)
  • 2 cups shredded mozzarella cheese
  • salt to taste
Directions:
1. Slice the eggplant into 1/2 slices, then cut those slices in half.  It's not so scary now! Take that! :0P
2. Preheat your oven for 400 degrees, because we need to bake this eggplant parm! Place 1/2 flour in one dish, lightly mix 2 eggs in another dish, and 1 cup of parmesan in yet another dish.  Dip the eggplant slices into the flour, then the egg, and lastly the parmesan.  Place the slices on a greased baking sheet. Don't forget to grease the sheet!! Bake for 25 minutes.
3. While those bake, heat the olive oil in a large skillet pan.  Dice the onion and place in the covered skillet to caramelize.  I add a bit of salt at this stage.
4. Once caramelized, add cans of tomatoes, sliced carrots, minced garlic, chopped basil, and diced Roma tomatoes to the skillet and cover to simmer.
5. Remove the baked eggplant from the oven and reduce the oven temp. to 350 degrees.
 Oh, and try not to eat one of these right away...good luck, I couldn't! Yum!
6. In a small bowl, mix the ricotta, 1 egg, and 1 cup parmesan.

7.Now it's time to layer!  Place a small amount of sauce in the bottom of a lightly greased baking dish, add 3 sheets of lasagna, then a layer of ricotta mixture, then eggplant, sprinkle mozzarella, then more sauce...repeat.  On the top, sprinkle the remaining mozzarella and sprinkle parmesan. I had enough to make an 8 x 8 pan and a 9 x 13 pan! :0) One for me and one to share~ bonus!
8. Cover with foil and bake for 30 minutes at 350 degrees, then remove the foil so that the cheese can get toasted.

9.  Remove from the oven and let it rest for about 5 minutes.  Then, dig in and enjoy! 
Okay Barney, you win...I love this eggplant!
Update:  My dad, a meat eating machine, even said that it was really good! :0)

Sunday, July 29, 2012

Got Zucchini?

Who doesn't, right? 
Zucchini...it seems to be the veggie that people ditch on your doorstep and try to throw in your direction.  But it doesn't have to be a thorn in your side.  It can be something new and spicy.

I love to preserve food, and this summer I wanted to try pickling.  Now, for me, I don't really like pickles.  I guess you could say that I'm picky about my pickles or pickled items.  I like them a bit sweet and a bit sour. 

My guidebook for pickling is this beautiful book.

This week I received some zucchini and summer squash in my CSA box and thought that I would try and different take on this troublesome veggie.


Pickled Zucchini Relish
By Rick Field and Rebecca Courchesne
Recipe copied from the book listed above

2lbs. zucchini ( I mixed in squash too- half and half)
1 large yellow or white onion, diced
1 red bell pepper, seeded and diced
2 Tbsp salt
1 1/4 cups sugar
1 cup distilled white vinegar
1 tsp celery seeds
1 tsp freshly grated nutmeg
1/2 tsp ground turmeric
1/2 tsp freshly ground pepper

Directions:


1. Chop, chop, chop...Chop zucchini (and squash), onion, and red bell pepper into small pieces.  Place in a non-reactive bowl with the salt.  Mix to combine.  Cover and let it sit at room temperature for at least 6 hours, but you can leave it sitting for a whole day.

2. The next day...have your jars and lids ready to go.

3. Drain and rinse the zucchini mixture a couple times.

4. Place the zucchini mixture into a saucepan and add the sugar, vinegar, celery seeds, nutmeg, turmeric, pepper, and 1 cup of water.  Stir. This smells so good!

5. Bring the mixture to a boil over high heat, then reduce the heat to medium-low.  Let it simmer for 25-30 minutes, stirring occasionally, and until it becomes slightly thickened.


6. Ladle the hot relish into the jars, leaving 1/4 inch of headspace.  Remove bubbles and adjust the headspace.  Wipe the rims and seal with the lids.

7. Process jars for 10 minutes in a boiling-water bath.

8.  The sealed jars can be stored in a cool, dark place for up to a year.  :0)

One of my favorite comfort foods is egg salad.  I love egg salad.  When I'm having a bad day, nothing makes me feel better like yummy egg salad, well, and a cookie.   This is a good alternative to pickled relish and will be a perfect addition to my comforting egg salad.

Now I need a sandwich...at least I have the relish ready! :0)

Friday, July 27, 2012

Pom Pom Wreath

It seems like I was just putting up my 4th of July wreath, and that was the end of June.
Poof! Where did July go?

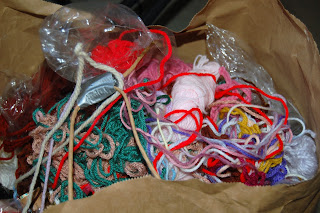
It was time for a change, so I looked around Pinterest, trying to find something to create using materials that I have around the house.  I have a ton of fabric, but I also have a TON of yarn, giving to me by a fabulous colleague at work.  So...what to do? Make Pom Poms, of course!

Oh Crafts: Pom pom flowers ideas
Pom pom flowers
http://ohcrafts.net/decoration-pom-pom-flowers.php
This site has so many fantastic and easy ideas...take a look when you get a chance, and go ahead and pin something too! :0) I like the flowers, and I'm probably going to make these somewhere else in my house, but that is not going to work for my door.  So I just adapted the idea.

Pom Pom Wreath
Supplies:
  • wreath- I picked one up at the dollar store!
  • yarn
  • scissors
  • ribbon
That's it...easy list of supplies, huh?!
Directions:
1. Choose yarn.  Now I had a mess of yarn to choose from...
There...that's better...

2. Begin wrapping the yarn around your fingers.  For a large pom pom, use 3 or 4 fingers, and wrap around many times.  The more wraps, the thicker the pom.


3. Slip it off of your hand and place it in the middle of a piece of yarn the same color. You will use this yarn to tie it on the wreath, so make sure it's long enough!
 4. Tie the single piece of yarn around the middle, in a tight knot.
5.Carefully cut the loops and the trim the ends to make an even pom.

6. Tie in on your wreath!
7. Now repeat...30 times! :0)
Lastly, hang it on your door and add some ribbon.
Poof! You're done!
Enjoy! :0)

Wednesday, July 25, 2012

Mr. Smarty Pants Pillow

Mr. Smarty Pants, aka Murphy, aka Murphinator, aka Turbo Paws

Having a Border Collie is NOT having a dog or a pet.  It is having an activity coordinator living in your home telling you what to do and when to do it.  And either you can handle it or you shouldn't adopt one.
My activity coordinator,
my best furry friend,
the healer of my heart,
and the reviver of my sparkle.


Murphy came into my life exactly when I needed him.  I desperately needed a bundle of love and someone to focus my energy into something positive. 

When I felt low, he would look at me with that face
and encourage me to play. 
Ahh...the healing powers of the dog park....in the rain, wind, snow, and sun.
So...what better pillow inspiration, than the face staring at me everyday.
First, I cut and placed pieces of different fabric...pinned into place.
Next, I began stitching...
and stitching...
and stitching.
Next, I cut 2 inch strips of this adorable red polka dot fabric
and attached them as a border to my Border Collie face.
Then, cut larger strips and created another border.

Then, I added the back piece of the pillow and stitched it all together.
Isn't this cute?!  I know that I'm bias. :0)

Finally, I added stuffing...
I think this is my fav. pillow now...of course, that's not surprising, because he's my fav. too!