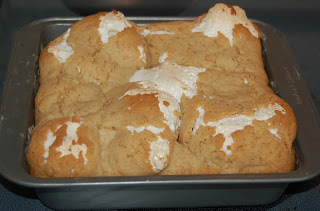
It might look funny, but it's yummy!
To me, dessert is the reason that you eat your veggies and whatever else your parents tell you to eat as a kid. I guess that still sticks with me today, because I look forward to enjoying the beginning and END of a meal. I've "pinned" so many desserts on Pinterest, that it was really difficult to narrow it down...these were the three chosen today, but there are so many more for the next picnic!
#1 S'mores Bar
This one is for my Mom...she LOVES S'mores...Yes Mom, I'm saving you one!
Recipe by Lovin’ From the Oven 1/2 cup butter, room temperature
1/4 cup brown sugar
1/2 cup sugar
1 large egg
1 tsp vanilla extract
1 1/3 cups all purpose flour
3/4 cup graham cracker crumbs
1 tsp baking powder
1/4 tsp salt
2 king-sized milk chocolate bars (FYI- I used 3 Hershey's bars because they changed the size...L)
1 1/2 cups marshmallow creme/fluff (not melted marshmallows)
This is my favorite way to smash graham crackers...plus it gets any frustration out!
1. Preheat oven to 350°F. Grease an 8-inch square baking pan.2. In a large bowl, cream together butter and sugar until light. Beat in egg and vanilla. In a small bowl, whisk together flour, graham cracker crumbs, baking powder and salt. Add to butter mixture and mix at a low speed until combined.
3. Divide dough in half and press half of dough into an even layer on the bottom of the prepared pan.
4. Place chocolate bars over dough. I had to break the bars, because the "new" king sized bars are thicker...
I knew that my mom was stopping by,
so I saved a little chocolate so that she wouldn't dive into the bars!
5. Spread chocolate with marshmallow creme or fluff. Do worry about trying to spread it out...the creme will kind of spread out and once you place the dough layer on top, you can press it down. :0)
6. Flatten the remaining dough out into small pieces and lay them together on top of the creme. This worked really well!
7. Bake for 30 to 35 minutes, until lightly browned. Cool completely before cutting into bars.
Mom, you are going to LOVE THIS! Tasty...
#2 Blackberry Pie Bars
Thanks to Emily Smith and her wild and delicious blackberries, I had an excuse to make this yummy sweet treat!Adapted from The Baker Chick
http://www.the-baker-chick.com/2012/07/blackberry-pie-bars.html
Crust and Topping:
1 1/2 cups all-purpose flour
3/4 cups sugar
1/8 tsp salt
1 1/2 sticks unsalted butter, chilled
(When doubling I used 4 sticks..I was thinking cups not sticks...and it was just fine)
Filling:
2 large eggs
1 cups sugar
1/2 cup sour cream (I used yogurt...)
3/8 cup flour (6 tablespoons)
1/2 teaspoon vanilla extract
pinch salt
3 cups fresh blackberries
1. To make the crust and topping, preheat the oven to 350 degrees. Grease and flour an 8x8 inch baking pan. (9 x 13 pan)
2. Combine the flour, sugar, and salt in the bowl of a food processor. Pulse a few times to mix. Cut the butter into 1/2-inch cubes, and add to the flour mixture. Process until the butter is evenly distributed but the mixture is still crumbly, 30-60 seconds. (I used my Kitchenaid mixer...worked great!)
3. Reserve 3/4 cup of the mixture to use as the topping. (I saved a couple cups to put on the top.)
Press the remaining mixture into the bottom of the pan, and bake 12-15 minutes. Cool for at least 10 minutes.

4. To make the filling, whisk the eggs in a large bowl, then add the sugar, sour cream, flour, vanilla and salt. Gently fold in the berries and spoon the mixture over the crust. Sprinkle the remaining crumb mixture evenly over the filling, and bake 45 to 55 minutes or until the crust is golden. (I had to bake it an hour and 15 minutes. It was really thick!)
While this baked, I had to take a little yogurt and berry break. Yumma!
Done!
5.Cool at least 1 hour before cutting into bars, or scoop out of the pan to serve cobbler-style.
Now on to the next one...
#3 Samoa-Me-Crazy Bars = Disaster
Recipe from Martha Stewart
Chocolate-Coconut Bars
Ingredients
- 3 cups finely ground cookies (12 ounces), such as graham crackers or chocolate wafers, or a combination
- 1/4 cup sugar
- 3/4 cup (1 1/2 sticks) unsalted butter, melted
- 1 cup pecan pieces
- 1 cup semisweet chocolate chips or chunks
- 1 can (14 ounces) sweetened condensed milk
- 1 1/2 cups sweetened shredded coconut
Directions
1. Preheat oven to 375 degrees. Lightly splash a 15-by-10-inch rimmed baking sheet evenly with water, then line with parchment paper.
***Okay, this was the problem. What Martha doesn't tell you is to grease the crap-ola out of the pan or the parchment, so that the crumb mixture doesn't stick. If you don't, it will stick like crazy, crazy glue! Boooooo!
2. In a large bowl, stir together cookie crumbs, sugar, and butter until combined. Evenly press onto bottom and up sides of prepared baking sheet. Bake, rotating halfway through, until firm, about 10 minutes. Transfer to a wire rack; cool, about 20 minutes.
3. Sprinkle cooled crust evenly with pecans and chocolate. Pour condensed milk over the top, spreading to cover completely (do not let it drip over the edges). Sprinkle with coconut.
4. Bake until coconut is toasted, 10 to 15 minutes. Transfer to rack; cool completely. Trim edges, if desired, and cut into equal-size bars. Yeah...okay Martha! Geesh! I wish that I could trim these!
Yeah...it smells good, but I can't taste any of it!
I can't just throw it away...chocolate, pecans, and coconut! No way!
So I scraped the top off. I know, it looks gross,
but I thought that it would be a good ice cream topper.
At least something good could come from this mess.
I wish that I had some vanilla bean ice cream. :0)
- This has been a day of delicious smells in my house....tempting...but I'm holding back. Okay, well I did try a little corner of each. I wouldn't want to serve something that I hadn't tasted! That would be against everything the baker in me says!
- I guess I'm just bringing two desserts thanks to Martha. :0P I wish this was the first time that she's let me down...sigh. Oh well, I won't give up on you Martha. Not this time.


.JPG)


