Showing posts with label chocolate. Show all posts

Tuesday, May 21, 2013

S'more Cookies

Yum, yum, YUM!!
People LOVE S'mores...
Well, most people do or at least they should!
What couldn't you love?
Chocolate, marshmallows, and graham crackers.
Now, I wasn't sure how or if I should add crackers, so I left them out.
But I definitely want to add those next time!

For my most recent Bake Sale I added these into the cookie rotation and they were a hit!
Next time I will need to triple the recipe to meet the demands of hungry (tempted) consumers.


S’more-ish Cookies
Slightly adapted from Chef-in-Training
Ingredients:
1 1/2 sticks (or 3/4 cup) butter
3/4 cup brown sugar
1/4 cup sugar
1 (3.4 oz) package instant chocolate pudding
2 eggs
1 tsp vanilla
1 tsp baking soda
2-1/4 cups flour
1/2 tsp salt
1 cup mini semi-sweet chocolate chips
1-1/2 cup mini marshmallows


Directions:
  • Preheat oven to 350 F.
  • Stir together flour, salt and baking soda and set aside.
  • In a large bowl, cream butter and sugars together.
  • Add in pudding package and beat until well blended.
  • Add eggs and vanilla and mix until smooth.
  • Add flour mixture slowly until well incorporated.
  • Add mini chocolate chips and mini marshmallows. Mix in.
Roll into 1″ balls and place on greased baking sheet.
Bake at 350 F for 10-12 minutes
I highly recommend making these cookies for your next BBQ, campfire, or just a Tuesday night.
Because I don't think you need a special occasion to enjoy a special cookie...
Any day is special when you have a delicious cookie like this.
Enjoy!

Thursday, April 11, 2013

German Chocolate Cake Cookies

This cookie flavor combo has been my nemesis.
I've tried different twists and turns with a variety of recipes...
...still it just wasn't what I wanted it to be.
But I'm picky.
It's my mom's fault.
Sorry mom, but it's true.
She introduced me to the finest German Chocolate Cake in Portland,
if not the entire West Coast, or the world!
JaCiva's.

Once you've eaten something that is so delicious, everything else seems sub par.
With the bar set so high,
each time I would try to make a German Chocolate Cake Cookie,
it just wasn't right.
The most difficult part was that I didn't know exactly how to fix the problem.
Until now.
After Christmas I found the Two Peas and Their Pod Red Velvet Cheesecake Cookie
 and made them for a Valentine's Day treat. 
They had just the solution to my cookie problem.
So I made some adjustments, crossed my fingers, and went for it.
The result?
Delicious, even for a picky cake eater like me.

German Chocolate Cake Cookies
Cake Adapted from Two Peas and Their Pod Red Velvet Cheesecake Cookie
and Frosting Center from Hannah Swensen Mysteries by Joanne Fluke

Ingredients:
For the cookie/cake dough:
1 box German Chocolate Cake mix
2 tablespoons all-purpose flour
2 large eggs
1/2 cup canola oil
1 teaspoon vanilla extract
 
Frosting Center:
½ cup firmly packed brown sugar
¾ tightly packed coconut
½ cup chopped pecans
¼ cup chilled butter (1/2 stick)
1 egg yolk beaten

Dough Directions:
In the bowl of a stand mixer, mix together cake mix, flour, eggs, oil and vanilla extract. Mix until smooth. Wrap the dough in plastic wrap. The dough will be oily. Refrigerate for at least two hours.
 
Frosting Directions:
1. Combine the sugar and coconut in a food processor.  Mix with the steel blade until the coconut is in small pieces.
2. Add the chopped pecans.(optional for allergies)  Cut the butter into four chunks and add them.  Then, process the mixture with the steel blade until the butter is in small bits.
3. Separate the yolk, place in a glass, and whip up with a fork.  Add them to your bowl and process until thoroughly incorporated.  (If you don’t have a food processor, you can make the frosting by hand using softened butter.)
4. Refrigerate until the cookie/cake dough to be ready.
 
Cookie Assembly:
(I learned a couple tricks from the last time.)
Preheat the oven to 350 degree F.
 
1. Divide dough into thirds. Cut two pieces of wax paper, large enough to cover the dough when flattened.

2. Roll out the dough in between the wax paper.  This will help in keeping the dough together...it's not that sturdy.

3. Slice the dough into square-ish shapes.  I use a cookie cutter and it works like a charm!
4. Take each square in your hand and place a drop of frosting in the middle.  Then wrap the edges of the dough around the frosting.  Make sure that seal all of the edges so that the frosting doesn't drip out!


5. Place them spread out on a cookie sheet.  I only put 8 on a parchment-lined cookie sheet....these cookies spread out.

6. Bake for 11-13 minutes or until the tops of the cookies begin to crackle.  Remove the tray from the oven and then let them stay on the cookie sheet for at least a minute before transferring them onto a cooling rack.
 
7. Once they are cool, wrap them up and share them with people that you love!


Enjoy this sweet little treat!
I think you'll adore 'em too!
Hugs,
Lori
 

Friday, December 7, 2012

Chocolate Sprinkle Crinkle

I just love sprinkles!
Sometimes...actually, every time that I go to my favorite decorating shop,
The Decorette Shop, I have to buy new sprinkles.


I guess I view sprinkles like I view sparkle...it just makes things better!

So what helps to bring the holidays along like a bit of chocolate and sprinkle? 
Nothin' in my book.  That combination is perfect. 
As I tried to pick cookies to sell for my Bake Sale Mission: Christmas (hint, hint) I searched through my recipe box and hunted through my cookbooks to find my favorite chocolate crinkle recipe.  mmmmm....Chocolate!  My Multiple Personality Cookies are pretty rockin', but I wanted something else too.

People love crinkles...so here is a favorite Chocolate Sprinkle Crinkle.
Chocolate Sprinkle Crinkle
Slightly adapted from Real Simple


Ingredients
  • 1 1/4 cups all-purpose flour
  • 3/4 cup unsweetened cocoa powder
  • 1 1/2 teaspoons baking powder
  • 1/4 teaspoon salt
  • 1/2 cup  unsalted butter, bring to room temperature
  • 1 cup light brown sugar
  • 2 large eggs
  • 1/4 cup powdered sugar
  • multi-colored sprinkles (I used Christmas colors!)
Directions:
1. Heat oven to 350° F. In a medium bowl, whisk together the flour, cocoa powder, baking powder, and salt.
 
2. With an electric mixer, combine the butter and brown sugar on medium speed until light and fluffy, about 2 to 3 minutes. Add eggs in one at a time, and mix until combined. Reduce speed to low and slowly add the flour mixture, mixing until it comes together. 
               
               
3. Form the dough into balls...I use a small cookie scoop. Roll the balls in the powdered sugar until it's fully covered. Then place on parchment-lined baking sheets, spacing them 2 inches apart. Add sprinkles to each cookie and press each  slightly with the palm of your hand.
 
4.  Bake until the cookies are firm and the tops crack, 13 to 15 minutes.
                               
5. Cool slightly on the baking sheets, then move to wire racks to cool completely.
 
 
6.  Enjoy and share these with some of your favorite people! :0)
 

Thursday, November 22, 2012

Pie Solves All

No, really...it does! 
How can any problem be big when you have a slice of
homemade pie sitting in front of you?!
Especially if the pie is chocolate!
I generally believe that all problems can be solved with tasty treats.
And, yes...I feed my feelings.
I know that goes against everything that health experts say.
"Don't reward yourself with food."
"Food is fuel."
"Eat before you go to the store."
Blah...blah...blah...
Yeah, I could repeat a whole bunch of them, but I love treats!
Even better, I love to make treats!
Actually, when I'm baking treats, I don't want to eat treats. 
Weird, right?! 
So if I just make treats all of the time, then I won't eat them!
WooHoo!
Sounds good to me!
Hmmm...Somehow I feel that this idea will backfire on me.
Possibly in a big way...but with the holidays here and in full swing, I might as well embrace that idea and bake.  And that is exactly what I plan to do!

This week I continued my bake sale by making pie and cookie orders. 
Of course, I enlisted the person who taught me everything that I know about baking pies and cookies...my mom.  She's the queen of baking.
She was in charge of Pumpkin Pie...
...Beautifully done Momma!
Me, well I was in charge of making the family Apple Pies...a classic is our world.
Plus, I needed to make cookies and pie cupcakes...yikes!  I love to make my plate full.
Don't worry, I made 12 of them, but forgot to take a picture at the end. :0) Too busy, I guess.


But, I also needed to make a few Chocolate Cream Pies...
...the challenge was that I had never made a Chocolate Cream Pie!
Good thing that I have a slew of cookbooks to help me along the way.

When in a jam, I look to the classic books...they have never steered me wrong.  I mean they're a classic for a very good reason.


Velvety Chocolate Cream Pie
Graham Cracker Crust Recipe from The Back in the Day Bakery Cookbook~ 2012
Cream Pie Recipe from Hershey's Chocolate and Cocoa Cookbook~ circa 1970's?

Graham Cracker Crust Ingredients:
2 cups graham cracker crumbs
1/4 packed light brown sugar
1 stick butter- melted
Directions:
Preheat oven at 350 degrees.
  1. Mash the graham cracker crumbs and brown sugar together with a fork in a medium sized bowl.  Add the melted butter to the mixture and mix together until all of the crumbs are coated in buttery goodness.
  2. Press the mixture into a 9-inch pie plate and bake in the oven for 6-8 minutes. (Though in my oven, 6 minutes was plenty of time.)  Let it cool completely before filling with chocolate cream.
Velvety Chocolate Cream Pie
Ingredients:
1/3 cup Hershey's Cocoa
1 1/4 cups sugar
1/3 cup cornstarch
1/4 teaspoon salt
3 cups milk
3 tablespoons butter
1 1/2 teaspoons vanilla

Whipped cream for a topping.

Directions:
  1. Combine cocoa, sugar, cornstarch and salt into a medium saucepan. Add milk into the mixture and whisk until smooth.
  2. Over medium heat, cook and whisk until it comes to a boil.  Once the mixture begins to boil, it will begin to be thick at this point, continue to boil and whisk for 3 more minutes.
  3. Remove the chocolate mixture, whisk in butter and vanilla, continuing to whisk until all of the butter is melted.
  4. Pour the mixture into the graham cracker crust.  Let it rest for about 15 minutes, then carefully press plastic wrap directly onto the pie filling.
  5. Refrigerate for at least 3-4 hours.  Serve with freshly whipped cream and enjoy!
Now seriously...how can you have a problem with this pie in front of you?! And if a problem arises, heck have another piece of pie! Problem solved. :0)
Happy Problem-Free Thanksgiving!

Friday, October 12, 2012

Todd Cupcakes = Bacon + Chocolate


...or nirvana
...or a little taste of heaven
at least that's what Todd the Science Guy said.
And actually, that's the only opinion that mattered.

Sometimes cupcakes should be
vanilla
or chocolate chip
or just sinfully sweet,
full of love,
and remind you of every other birthday that you've had. 
Those cupcakes are fantastic,
but sometimes those cupcakes aren't quite fitting.

Some people just inspire me to try something different.
That's Todd.
How do you describe a Todd.
He's...well...just Todd!
Really, I just don't know how to describe him,
       except that he's like an awesome neighbor.
-The kind that would come over in the pouring-down rain to help dig a trench if your basement was flooding.
-Chop down that tree that fell down in the storm and take home the          firewood.
-Or come over if there's a weird animal in your shed,
                                           and you were too terrified to look at it, or even open up the door.
                                                            Todd would take care of that creepy critter.

Everyone needs a Todd in their world.

That's why when it's a Todd birthday, normal everyday cupcakes,
though delicious, they would not suffice. 

That's why I made him Bacon-Chocolate Cupcakes.
Heck, he loves bacon and chocolate, so why not?!

Bacon-Chocolate Cupcakes
Chocolate Batter recipe from Better Homes and Garden Cupcakes
Marshmallow Frosting recipe from The Happy Housewife
Ingredients:

Bacon-Chocolate Cupcakes:
3/4 cup butter
3 eggs
2 cups all-purpose flour
3/4 cup unsweetened cocoa powder
1 teaspoon baking soda
3/4 teaspoon baking powder
1/2 teaspoon salt
2 cups sugar
2 teaspoons vanilla
1 1/2 cups milk
1/2-1 pound cooked bacon- crispy!
 
Frosting:
- 7 ounces marshmallow cream
- 1/2 cup butter softened
- 1 teaspoon vanilla
- 3 1/2 cups powdered sugar
- 2-3 tablespoons milk
 
Topping:
- Magic Shell (yes...magic shell!)
 
Directions:
Cupcakes:
1. Preheat the oven to 350 degrees. 
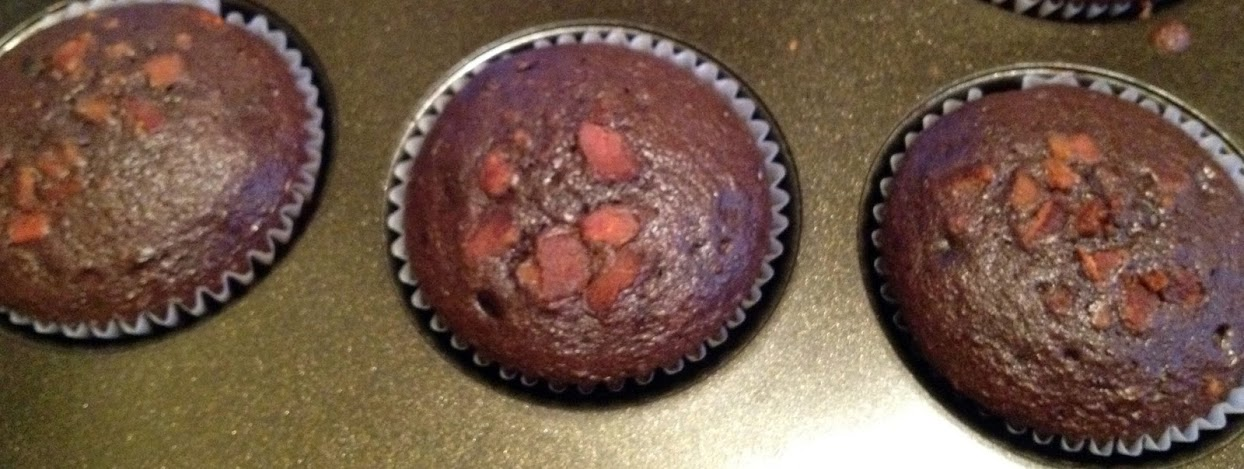
2. Chop and cook bacon, then chop the cooked pieces into small chunks.  Save a few longer strips to place on the top.
 
3. Place butter and eggs on the counter and let stand at room temperature for 30 minutes. Line two muffin tins with paper cupcake liners.
 
4. In a medium bowl stir together flour, cocoa powder, baking soda, baking powder, and salt. Set aside for later.
 
5. In a large mixer, beat butter with an electric mixer on medium to high speed for 30 seconds. Gradually add sugar, beating on medium speed until light and fluffy. Add eggs, one at a time, beating well after each addition. Mix in vanilla. Alternately add flour mixture and milk to butter mixture, beating on low speed after each addition just until combined.
 
6. Add some of the crumbled bacon into batter and mix gently.
 
7. Spoon batter into prepared muffin cups, filling each cup two-thirds full. Add bacon crumbles to the tops of the cupcakes before baking...a little more is always better!
 
8. Bake for 18 to 22 minutes or until a wooden toothpick inserted in centers comes out clean. Cool cupcakes completely before frosting.


Frosting:
1. Mix all ingredients together until smooth. Add extra milk if necessary to get the correct consistency.
2. Frost cooled cupcakes.
3. Add magic shell and a strip of bacon to the top of each cupcake.
4. Chill cupcakes in the refrigerator until topping forms.

Share and enjoy with your friends....especially if you have a Todd.
Todd's love bacon...they love chocolate...
...and they deserve some tasty, unique treats.


If you don't already have a Todd, you should find one. 
Everyone needs a Todd. 
Happy Birthday to all of the Todd's out there!

Friday, September 14, 2012

Multiple Personality Cookies

Is it a cookie or is it a brownie? 
I think it's a little confused.
I think that I'm a little confused too.
What I do know is that it's a little bit nutty...
This cookie might have multiple personalities, but I love them all.

I like brownies, but I love cookies...I mean LOVVVVVVE COOKIES.
I'd stalk the cookie if I could...but that would be ridiculous...cookies are just cookies.
Cookies make me really happy. 
If a day is crazy, a cookie makes it manageable.
Today was crazy...I need a cookie.

But oddly I want a brownie.
Really I think that I'm just really craving chocolate.
The problem, (not really a TRUE problem)....
The problem, in my world with a brownie, is that it lacks the subtle crunch that I cookie gives.

Okay...now I really need a cookie.  I needed it about 15 minutes ago...

Multiple Personality Cookies
(Brownie-Cookie)

Ingredients:
½ cup butter
6 (1.5 ounce) squares unsweetened chocolate
2 cups regular semisweet chocolate chips
2 1/4 cups all-purpose flour
½ teaspoon baking powder
½ teaspoon salt
4 large eggs
1 ½ cups sugar
2 teaspoons vanilla extract

Topping:
1 cup mini semisweet chocolate chips
1 cup mini white chocolate chips
1 cup chopped almonds

Directions:
1. Combine butter, unsweetened chocolate, and 2 cups regular chocolate chips in a saucepan and cook over low heat.  Stir constantly until butter and chocolate melt, then let it cool.

2. Combine flour, baking powder, and salt in a small bowl, then set it aside for later.

3. In a stand mixer , beat eggs, sugar and vanilla at medium speed until it is light in color and fluffy.

4. Gradually add dry ingredients to egg mixture. Mix it well until all ingredients are combined. Then add the chocolate mixture and mix well again.

5. Scoop dough onto baking sheets 1 inch apart.

6. Add toppings...I like to arrange the toppings in 3 sections to represent 3 different personalities of a brownie-cookie-chocolate fest.

7. Bake at 350 degrees for 10 minutes.
Cool slightly on baking sheets; remove to wire racks to cool completely.
 
This cookie has all of my favorite cookie personalities...
chocolate, chocolate chips, and nuts. 
Plus, it's crunchy and chewy. Delicious.
Make these and share the joy to other people
who are feeling a bit nutty after a crazy day. 
You'll feel better...I promise. 
If one cookie doesn't perk you up,
I suggest eating two...or three. I
 needed three today.  It was a rough one.